
5 Must-Try Watercolor Techniques For Your Next Projects
"If I have any advice to anybody, it's this: take up watercolor painting." - Charles Bukowski.
Watercolor is a beautiful medium that allows for endless experimentation and creativity. If you want to take your watercolor projects to the next level, trying out various techniques is essential. After all, art is a never-ending cycle of constantly learning and improving. So whether you're an artist looking for new inspiration or a beginner seeking to expand your skill set in this medium, this blog post is for you!

Today, we will discuss five must-try watercolor techniques that inspire you to think outside the box and create truly unique and stunning artwork. From the dreamy and soft effects of wet on wet to the gritty and textured effects of dry brushing, these techniques will open up a whole new world of possibilities for your watercolor art. So get your brushes primed and ready; it's time to find out how to make the most of this medium!
Watercolor Technique #1: Wet on Wet
Wet-on-wet is a versatile and creative watercolor painting technique. It's usually the first watercolor painting technique that beginners learn. It involves working with water by putting wet paint on wet paper or wet paint over a fresh layer of paint.
In this technique, you let the water control the blending and spreading of your pigment, resulting in soft and unique colors. Wet-on-wet is perfect if you want to create soft, dreamy landscapes and abstract pieces. With practice, it can also yield beautiful and complex paintings over time.
To get started, you need to apply a light wash of water on your watercolor paper. Then, load a damp brush with pigment, and start painting. The colors will flow on the areas where you added the water.
When painting wet-on-wet, it is essential to work quickly as the paint can dry quickly, and it's also important to note that the amount of water and paint used will affect the outcome.
Watercolor Technique #2: Dry Brushing
On the other hand, dry brushing entails the opposite of the wet-on-wet technique. Instead of using water to get a wetter and less distinguished look, dry brushing creates bolder colors, textures, and depth in your projects. In this method, you would need to use more paint and little to no water. When you use this method, you can use a stiff or flat brush to make it easier to add details.
Dry brushing involves using a dry brush to directly apply paint to dry paper, creating a rough and gritty effect. It's perfect for creating rugged landscapes, tree trunks, rocks, and other subjects that need fine details. It can also be a great way to incorporate highlights and broken line effects in your painting. As seen in this gorgeously realistic painting by Veneta Docheva (Венета Дочева), she used the dry brush technique to create water highlights for the ocean.
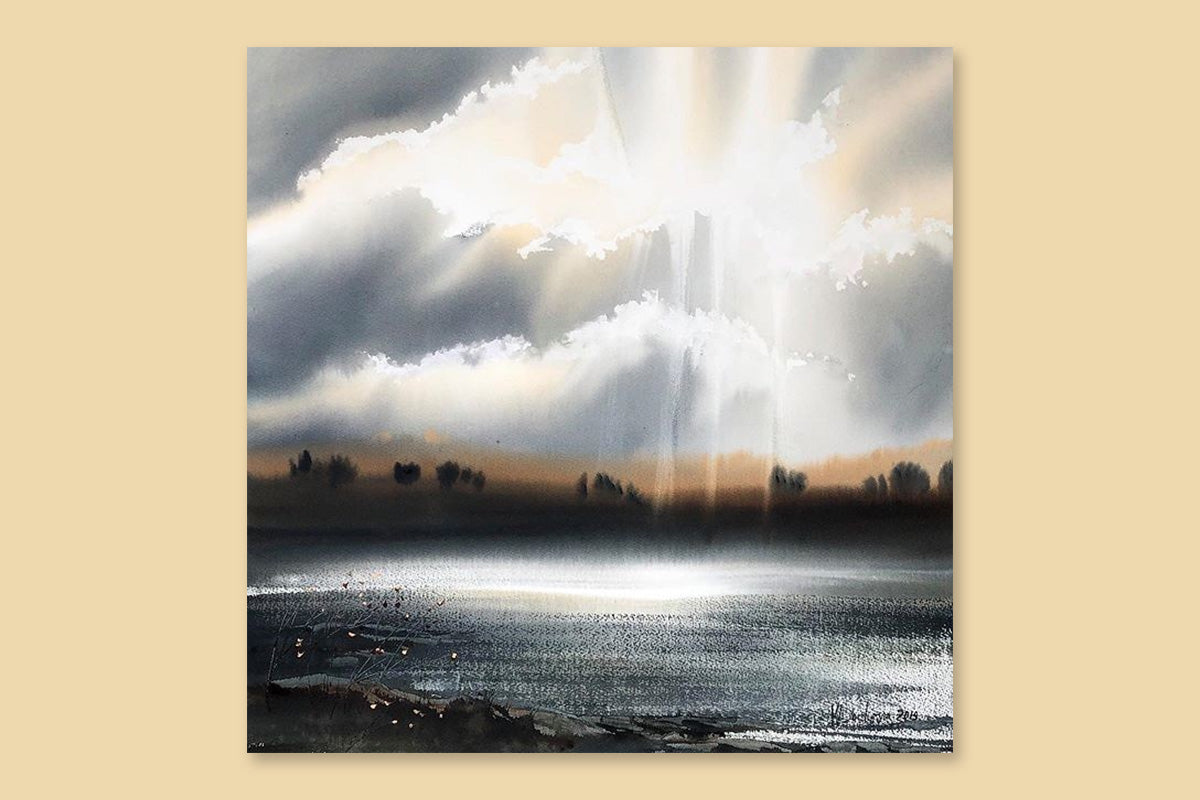
A Beautiful Watercolor Painting by Veneta Docheva. Copyright by Kalacheva School.ru
Watercolor Technique #3: Playing with Salt and Alcohol
If you're curious about making watercolor art with unique textures and patterns, all you need are everyday household items, like salt and rubbing alcohol!
Did you know that you can use rubbing alcohol to add unique effects to watercolor paintings? When added directly to watercolors, rubbing alcohol will push away the pigment, leaving light marks or white areas on your paper. You can use Q-tips and droppers to directly add alcohol to watercolor paper to create exciting patterns and effects.
On the other hand, you can also use salt in the same way. Using different kinds of salts on watercolors can create beautiful effects like snowflakes, wildflowers, stars, and more! You can also experiment with putting salt on watercolors with different levels of wetness - from damp to wet watercolors. To play with salts, simply sprinkle some table salt, sea salt, rock salt, or other salts of your choice while your watercolor painting is wet. After it dries, gently use a dry brush to scrape off any excess solid salt bits.
These two supplies will make all the difference to your watercolor projects. Remember that the results are not always predictable - and that's what makes watercolor painting so fun!
Watercolor Technique #4: Glazing
Glazing is the art of layering transparent colors over one another in watercolor painting. The difference between glazing and mixing colors is that in mixing, you mix colors to blend the pigments while they're wet, while glazing involves applying color over a dried layer of paint.
It is one of the best watercolor techniques to learn as a beginner because it will help you create a richer color scheme, thereby adding complexity and nuance to your watercolor projects. This is because glazing allows the underlying colors to show through, giving your paintings a sense of depth and distance.

Artists' Watercolor 24-Pan Set
Glazing is another reason you should always swatch your watercolors first. It's also important to know just how much your watercolor pigments lift because some watercolors are lighter when they dry vs. when wet. This is to ensure that you know the shades and hues of colors when you layer and combine them.
You wouldn't want to be in the middle of glazing a tree with red and blue - only to find out that the color of your leaves turned grayish instead of bright purple! Complementary colors don't always work in glazing, as the difference in hues and shades can result in different colors. As said above, mixing colors is different from glazing.
Watercolor Technique #5: Lifting and Scratching
The final technique we'll talk about is lifting or scratching. These techniques involve lifting or scratching off wet paint to reveal the white of the paper beneath. It's great for creating highlights and details in your paintings, such as the highlights on a leaf or the texture of a rock.
In lifting, you can use tissue paper or a dry brush to absorb some of the pigment on your wet paint, making the colors lighter. When lifting paint, it's important to work quickly as the paint dries quickly, and it's also essential to work in small areas at a time to maintain control of how much pigment you want to lift.

On the other hand, scratching is similar to lifting, but it involves using a tool to scratch the surface of your paint, creating different streaks and marks on the page rather than fully absorbing pigment. Scratching creates a textured effect and can be used to make fur, hair, or other textures. You can use a twig, a pen, a fine brush, and even a palette knife for scratching - the possibilities are limitless!
Level up Your Projects With These Fun Watercolor Techniques!
Watercolors are one of the most fun, versatile, and unpredictable art mediums. With this medium, you can make a lot of "happy accidents," and it will still turn out to be a beautiful piece of art. Indeed, watercolor painting is a great way to flex your creative muscles - and we hope you do it with this list of watercolor techniques!

If you want to learn more about watercolor tips, tricks, and how to paint with watercolors, stay tuned to our Creative Corner blog. We'll cover everything - from the basics to more advanced techniques, so you can start creating beautiful paintings in no time!
2 comments
Thank you so much! We appreciate your kind feedback :)
Your blog is both informative and helpful.
https://www.artelixir.in/